
How To Treat Club Feet And Closely Related Deep Flexor Contraction
- Shannon Redden

- Dec 11, 2020
- 15 min read
2003 - 16th Annual Bluegrass Laminitis Symposium Notes
How To Treat Club Feet And Closely Related Deep Flexor Contraction
Written and presented January 2003 by R.F. (Ric) Redden, DVM
Products for Club Feet Before we begin discussing how to treat any foot problem, we must first take a closer at the details of the respective foot. Many years ago, I found a need to develop a very simple classification system that would allow horseman, veterinarians and farriers to better communicate. Using the graded scale of 1-4 allows everyone involved to be on the same page when discussing a particular case.
Club feet are the result of mechanical imbalances that are most likely attributed to malfunctions within the deep digital flexor muscle belly. The muscle fibers normally receive an electrical stimulus that tells them to contract. This causes the fibers to shorten and subsequently move load. Apparently the imbalance is a problem at the synopsis (nerves/muscle cell unit), which results in the muscle receiving a continuous command to contract. This spastic muscle transfers the constant shortening, or pulling, to the tendon that is firmly attached to the semi-lunar crest along the posterior palmar surface of the coffin bone. Shortening the distance from the origin to the insertion point pulls the coffin bone around its articular axis.
In very soft footing, the laminae and hoof capsules move simultaneously with the flexion of the joint. Anything that changes the free flow action creates a resistance that is directly proportional to the forces at play. Basic ways to increase the counter forces placed on the muscle, tendon, bone, laminae and hoof wall network are:
1. Lower the palmar angle without decreasing the digital breakover. Lowering the heel in an effort to treat the high-heel club significantly increases the tension within the network.
2. Increase the length of digital breakover. Extend the toe using a shoe or composite also increases the forces within the network.
3. Lowering the heel and extending the toe tremendously increase the tension on all structures.
Listed above are three basic treatment plans that are often used in an effort to minimize the high heel/no toe growth syndrome. The counter-pull mechanical plan can be effective on low grade clubs, however it can create a devastating sequence of events for the higher grades. This reinforces the reasons to have a meaningful scale. It allows us to customize each treatment plan to the specific demands of each case.
The grading system for a club foot horse is quite simple, it is broken down into four categories. For individuals who have used it for several years, it can be broken down into twelve categories, grades -1, 1, +1; -2, 2, +2; etc. Note the diagrams below and basic guidelines that will help you quickly develop an eye for all four grades.
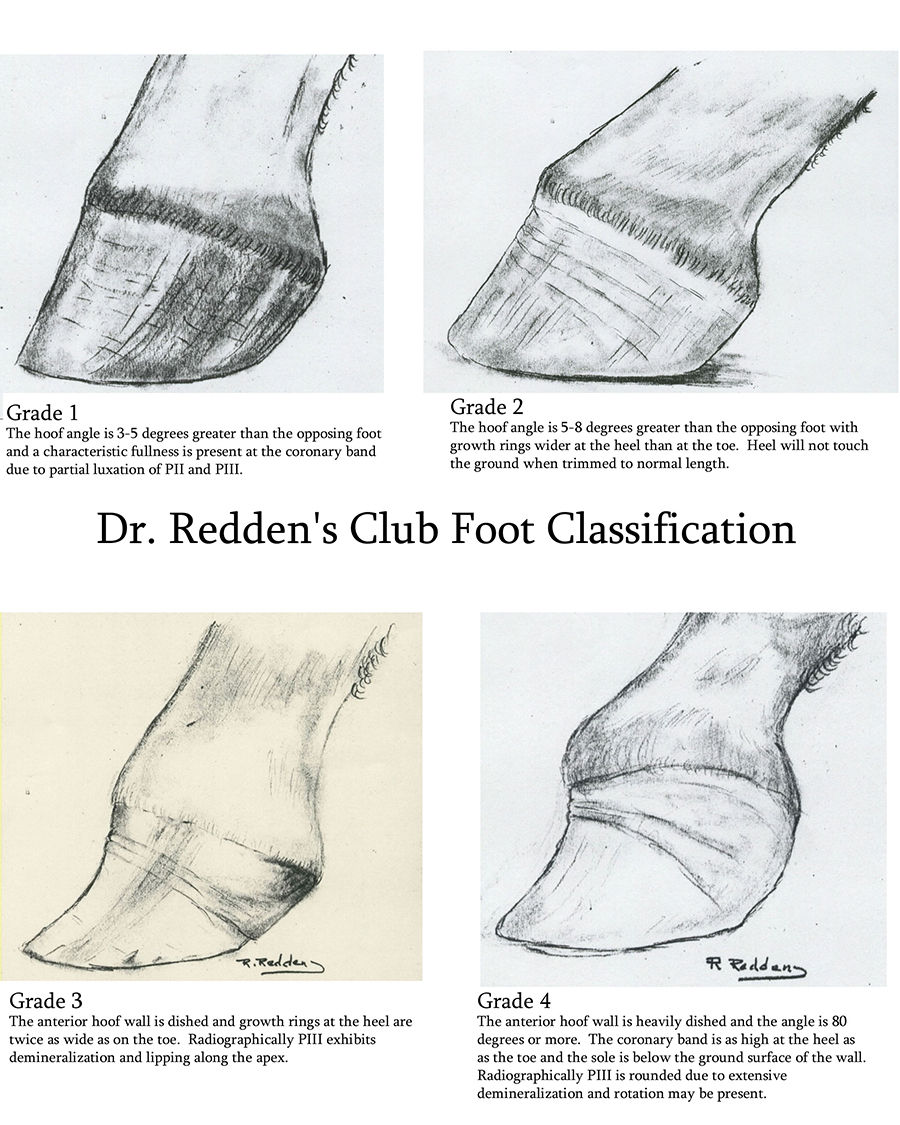
The following text corresponds with the images above:
Grade 1 -- The hoof angle is 3-5 degrees greater than the opposing foot and a characteristic fullness is present at the coronary band due to the partial luxation of P2 and P3.
Grade 2 -- The hoof angle is 5-8 degrees greater than the opposing foot with growth rings wider at the toe. The heel will not touch the ground when trimmed to normal length.
Grade 3 -- The anterior wall is dished and growth rings at the heel are twice as wide as the toe. Radiographically, P3 exhibits demineralization and lipping along the apex.
Grade 4 -- The anterior hoof wall is heavily dished with an angle of 80 degrees or more. The coronary band is as high at the heel as at the toe while the sole is below the ground surface of the wall. Radiographically, P3 is rounded due to extensive demineralization, and rotation may be present.
When discussing how and when to treat club feet in horses, we must also look at the age and intended use of the animal. Treatments tailored for the unique characteristics and demands of each foot often reap more successful outcomes.
The club foot syndrome can be found in foals one month of age. The lower grades, 1 and 2, are the most common. The majority of cases reach four to five months of age before noticeable differences are detected. Newborn foals that have significant deep flexor contraction are often up on their toes or even knuckled over with the more severe contraction.
Most cases respond in a favorable fashion using a variety of treatment methods; tetracycline, toe extensions (taped or glued on), splints, cast, snap on fiberglass splints, air splints and stall confinement can be used very successfully to treat the foal with a contracted tendon. Keep a record of foals with contracted tendons and you will find a large majority develop a club foot with a grade of 2 or higher by the time they are five months of age.
Treating early stage club syndrome increases the odds of preserving bone integrity and the health of the soft tissue growth centers. Therefore, it is very important that all responsible parties develop an eye for the early changes that clearly describe a grade 1 club. The first noticeable difference is the pastern alignment. It is pushed forward and will appear in the same linear plane as the face of the hoof capsule.
Stand back ten feet and look at the negative space that borders the face of the hoof and pastern. The normal foot will have a pastern that is set back slightly and still be parallel to the anterior face of the hoof. The toe angle will be 5 degrees steeper than the opposite. The angle depends on the breed, age and the unique characteristics of the individual.
I disagree with much of today's literature that describes feet on young horses as having 60 degree hoof angles. It is obvious to me that individuals who subscribe to that opinion have never actually measured the toe angle on many foals. It is rare to find a foal with a hoof angle less than 63-65 degrees, regardless of the breed. This angle doesn't start dropping for several months unless aggressive trimming techniques are used to remove the strong heel that is found on most foals.
Looking closely at the sole surface of a club foot, the bars are beginning to turn inward at the heel and many times touch the frog. Compared to the opposite heel, there are stark differences in angles of the quarters. The heel tubules are slightly tighter with as much as 5-10 degrees difference. Using close up photography, with the projection angle perpendicular to the surface of the foot, you can train your eye to notice the subtle details.
Treating the Club Foot, Grade 1 I like to push the heel back to solid, strong heel starting at the center of the frog area. I then rocker the toe forward from the same point leaving the center of the foot as a noticeable pivot point. Leave the frog and sole and put a smooth, but non-invasive, radius on the ground surface horn. This method promotes the flow of nutrients to the sole, which accelerates sole proliferation. This, in turn, protects the very soft and vulnerable palmar surface at the apex.
Enhancing sole growth also stimulates anterior horn growth. This effect is the direct result of significantly reducing the tension on the deep digital flexor tendon by pushing capsular breakover to the middle of the foot. The tendon is not opposed by forces at the toe, therefore a lifting effect occurs within the capsule. This phenomenon can be clearly demonstrated with venograms. Re-examine the foot in ten days, if the heel and toe growth rate appear to be equal stay with this very simple, but yet effective, method.
Trim the foot every two weeks to maintain the mechanical advantage necessary to offer equal toe and heel growth. Some grade 1 feet will remain as such for the duration of the horse's life without any treatment whatsoever. Others will proceed up the ladder to the higher grades; some very rapidly, others taking many months to reach the higher grades. At the onset, it is difficult to know which one will have a stronger tendency to continue contracting. Treating all of them very early certainly sorts this out very quickly.
For many years, traditional methods have been prescribed for club feet as a whole (no grades considered). These methods focus on making the foot appear as if the club immediately went away. Using a good sharp rasp and a little imagination anyone can take enough foot away to make the remaining stump appear as if it never was clubby. The club is the same as it was before with one exception; the foot has far less natural horn protection, and the deep digital flexor load has been significantly increased rather than decreased.
Increasing the tension on the deep digital flexor as it attaches to the coffin bone, laminae and horn network by excessive sculpturing can and often causes permanent bone damage due to simple internal download. The result shuts down the fimbriae that grow the sole, it compress the circumflex vessels tightly between the palmar surface of the bone and wall, it shuts down tubule production at the toe and enhances tubule growth at the heel. Ten days later, the heel growth exceeds toe growth, a slight dish forms at the toe and there is less sole than when the foot was trimmed and shod. Farriers that use the older, more traditional method designed to stretch the muscle and tendon need to be very aware of the case that doesn't stretch. Continued application of the stretch mechanics creates a thinner sole, more horn growth at the heel, and it can be cause permanent bone damage.
Treating the Club Foot, Grade 2 & 3 Grade 2 club feet have very distinct changes that can easily be seen. For example, the heel growth pattern is twice as wide as the toe. When asked to stand with the toe of the club foot slightly behind the heel of the opposite foot, an air space will be present under the heel. Try passing a piece of paper under the heel, as the space is difficult to detect unless your eye is at ground level.
A Grade 3 club foot will have basically the same characteristics. The growth at the heel may exceed the toe growth three or even four to one. The anterior face of the hoof capsule will have a distinct dish, which is the result of excessive internal down loading created by the resistance of the toe against the unrelenting pull of the deep digital flexor tendon.
Successful treatment is dependent on the ability to adequately disrupt the pull of the deep digital flexor tendon. A set of soft tissue, pure lateral radiographs with wall and ground markers provides the information needed to better evaluate the sole depth, palmar angle, horn-lamellar zone, bone shape and load induced changes. Using the traditional stretching concept for grade 2 and grade 3 clubs places tremendous internal load on the soft, fragile apex. This triggers a cascading sequence of events. The bone actually begins to bend at the lower third, much the same way hoof capsules does for the same reason. The sole is also compressed, strangulating the nutrient supply to the solar plexus. This, in turn, stops sole growth.
The next stage is bone re-absorption, which is often accelerated by the presence of soft tissue sepsis due to excessive wear and abscesses at the toe. Once the dished apex appears rounded off with roughened borders, the prognosis for athletic performance is significantly decreased. Therefore, it is critical that you make every effort to prevent the second stage fallout.
Using the radiographs as a blueprint, we can design the mechanics indicated on the film. I like to draw a line parallel to, and 15-18mm below, the palmar surface of PIII. The line becomes the trim line. Often times, the toe is quite thin so little if any can be removed. I fabricate an aluminum shoe with a rocker rail, (note diagram) and apply it with Equilox. The belly of the shoe allows self-adjustment of the palmar angle, which relieves the pull on the deep digital flexor tendon. Subsequently, the blood flow to the deprived area of the sole and bone is enhanced.
These cases often show a significant measurable increase in sole depth and anterior horn growth within three weeks post shoeing. Reset in the same fashion until favorable results are obtained. Favorable results are even growth ring patterns, the trimmed heel can load evenly when placed behind the opposite foot, and sole depth can easily be maintained at 15+mm. Those that fail to show a favorable response are considered for surgery.
When To Cut the Check Ligament First, I ask the client what his/her goals are. Next, I explain that all inferior check desmotomy surgeries leave a noticeable and palpable scar. Many surgical sites are only slightly blemished, others can be very unsightly for no apparent good reason. Nevertheless, these scars are to be expected. The benefits must always outweigh the disadvantages when making the decision to perform surgery. The athlete's ability is rarely threatened with this surgical approach, but complications can arise that diminish the positive aspects of the procedure.
Shoeing Prior to Surgery I have seen numerous cases that had the check ligament cut and nothing done to realign the natural load zones of PIII. Consequently, the check healed back at the same length and the foot remained the same. Cutting the check is a simple mechanical procedure designed to diminish the pull of the deep digital flexor tendon. Cutting it certainly accomplishes this goal, but failing to realign the palmar angle does little or nothing to improve the foot. The palmar angle is trapped in a permanent position with the semi rigid horn capsule. To gain optimum results one must allow the foot to quickly remodel around the readjusted palmar angle as the check is healing. The surgical gap is only present for a few weeks at best and soon becomes a permanent scar, which has little or no ability to be stretched. Getting the optimum stretch just prior to surgery compliments the surgery.
Using the lateral radiographs as a shoeing guide, draw a line parallel to the palmar surface and 18-20mm below the wings of PIII. This is the position of the shoe once the foot is trimmed. Extend this line forward until it bisects a line drawn from the most proximal horn wall to the toe area creating a 50-52 degree imaginary toe angle. Feet that have been previously trimmed every ten days to two weeks will have very little, if any, heel to remove, but the shoe must set in the prescribed position in order to gain optimum stretch or gap once the check is cut. The zero palmar angle and 50-52 degree actual toe angle will be bit overkill, but years of experience with a large number of cases has taught me not to be conservative with higher grades as they have a tendency to drift back to the club syndrome given any chance at all.
To apply the pre-surgical shoe, use a rasp to roughen the wall at the heels. Push the heel back creating a flat zone parallel to the palmar surface as described. Caution: Learn the landmarks that help you go from film to foot. The common error is to remove far too much foot in an effort to set the shoe on the toe. This creates positive palmar angles and severely compromises the circumflex network.
Clean the toe area well. Look for splits in the sole wall junction that may be harboring potentially harmful bacteria. To be assured that you don't seal up these potentially hot areas with Equilox, use a small amount of Keratex Putty to protect them from the composite. I cannot over stress this step; abscesses under Equilox can be extremely painful and cause irreversible damage to the bone, as well as growth centers.
Normally I use an aluminum queens plate shoe shaped much like a mule foot. This shoe is actually propped up at the toe. The Equilox fills the gap between the shoe and sole. Sole pressure is not a concern once the check is cut as the download is significantly reduced. This prevents the majority of internal compression.
The foal must be sedated and the foot surface cleaned well prior to applying the Equilox. Once it is applied, hold the foot up until the Equilox has cured. In cold weather, warming the shoe and Equilox will speed up set time.
Apply the support aid: Once the shoe is on, I don't allow the foot to be loaded until I have applied a large wedge of Advance Cushion Support to the bottom of the shoe. This wedge must be thick enough at the heel to replace the original palmar angle in relation to the ground. Setting the foot down without this large wedge puts tremendous load on the laminae, apex and sole simply due to the increased lever action of the toe extension and zero palmar angle. Once this wedge has been applied, the foal is ready for surgery. The procedure can be performed immediately or even days later, as the sensitive structures of the foot are well protected with the rubber wedge.
Surgery - Inferior Check Desmotomy I prefer to cut most checks using local anesthesia, blocking above the knee, and a light sedation (Dormosedan .2 - .25 cc.) for most large foals. The elevated heel reduces the load on the deep digital flexor tendon, making it relatively easy to slide a retractor under the insertion of the check as it fuses with the deep. This junction is more distal than one would think and is not readily visible. Dissect with a pair of Metzenbaum scissors. A good thorough review of a post mortem limb prior to your first attempt is very helpful.
I make a small incision (1-1.5 inches) just proximal to the anastigmatic branch. The lower incision makes it much easier to bandage, and it offers better cosmetic appearance because there is little or no muscle fiber in the insertion area. I leave the raised heel wedge on for a couple of hours following the surgery. This allows the foal to recover from general or local anesthesia without causing unwarranted stretch to the support ligaments, joint capsule and realigned joint surfaces. When the surgery is performed with the foal standing, I want the foal to have normal sensitivity in the foot before removing any portion of the wedge.
Low grade clubs are not a big concern, but the higher grades the heel needs to be lowered gradually; this could take hours or days depending on the case. When removing the wedge, trim about one third of the rubber wedge off, re-tape and observe the foal for excessive soreness. If they are the least bit sore, wean the wedge down slowly. Twenty-four to 48 hours is normally all it takes.
Slamming the heel down immediately following surgery can cause very serious damage to the support structures within the foot. Take a look at the pre and post op film. Note the close proximity of the navicular bone as it relates to the proximal, posterior border of PII. If the supporting apparatus of the navicular bone is part of the syndrome, stretching the area during recovery from anesthesia while the foot remains blocked can damage the navicular ligaments, navicular bone and impar ligaments.
Post-op Care I normally confine the patient to stall rest on firm footing (no deep bedding) for 30 days. Afterwards, I graduate to a one acre paddock. Reset the shoe every 30 days using soft tissue detail, pure lateral film as a guide. I prescribe a prophylactic dose of broad-spectrum antibiotics for seven to ten days, and I bandage the leg with a very firm combine bandage. This bandage should be changed every seven to ten days for a period of 60-90 days. The longer the bandage is left in place, the less edema occurs. Over the course of 90 days, the bandage can be weaned off and normal turn-out exercise is resumed.
Complications Less than optimum results can be obtained with any surgical procedure. A few commonly found problems include:
1. Failure to adequately realign the palmar surface of PIII. Omitting this step prevents a surgical gap in the check ligament following surgery, and therefore offers little, if any, relief to the growth center of the foot.
2. Failure to dissect the entire check ligament, especially when cutting high. The check is very thick and soft due to muscle fibers. It is easily split when gathering the entire check belly with a retractor. The check is crescent shaped and wrapped around the deep in the higher surgical approach area. Once it is split with the retractor or partially dissected, the remaining portion is difficult to locate due to its close proximity to the medial vessels and nerves.
3. Cutting the muscle fibers. Cutting these fibers promotes normal serum leakage, which adds to the scar. It can also foster an environment for post-op blood clots that can cause weeks of serum leakage and unsightly scars.
Treating the Club Foot, Grade 4 This is a totally different situation than the lower grades, simply due to the degree of mechanical imbalance. The heel is higher than the top of the coronary band and most have a tremendous dish in the hoof wall. They also have a 15-40 degree palmar angle, excessive heel growth, little if any toe growth and advanced bone disease.
Using the prescribed treatment for any of the lower grade clubs previously described, including the check desmotomy following re-alignment shoeing, offers little if any relief for the grade 4 clubs. I prefer to shoe these cases in precisely the same manner described above, but I elect to cut the deep digital flexor tendon mid cannon. This offers several advantages over the more conservative check surgery. There is little, if any resistance opposing the flexion of the coffin joint, which offers maximum relief to the internal structures of the foot. It is quite an easy procedure to perform on the standing horse using location anesthetic and sedation. Cutting the deep digital flexor also offers much better cosmetic appearance than the check desmotomy. Athletic ability doesn't appear to be threatened by early, successfully managed tenotomies. I have had horses perform at top level in many sports, with the exception of racing.
Complications Due to the severity of the contraction syndrome, the support ligaments of the navicular can be part of the pathological process. The re-alignment process drastically changes the palmar angle, increases the forces on the impar ligament, navicular bone and supporting ligaments of the navicular bone when these structures are part of the syndrome. Allowing the horse to bear weight while blocked can literally pull the navicular bone away from its attachment to PIII. This can create a catastrophic avulsion fracture through the body of the navicular bone and/or rupture the suspensory ligament rendering the horse crippled. Slow and gradual removal of the rubber heel wedge tremendously decreases the risk of such post-op complications.
Deep Flexor Contraction This syndrome is similar yet strikingly different than the club syndrome. It is more explosive in nature and can escalate to extreme contracture in a matter of days. The club syndrome, on the other hand, is much more gradual and may require months to reach the higher grades. Fortunately, most cases never even proceed above grade 2.
The hoof capsule and bone characteristics are also strikingly different. The club foot develops a dish and bends the face of PIII creating a lip at the apex due to the relentless pull of the deep as it slowly pushes the heel upward onto the toe. Deep flexor contraction feet have a bull nose hoof capsule (bent back), and the coffin bone has a similar shape. The apex is turned back under the bone resembling the shape of a hawk's beak. The horn-lamellar zone will be much smaller at the apex than the more proximal one due to the forces at play and explosive nature of the syndrome. The contraction phase is very short, and the the heel and palmar angles can increase up to 45 degrees in a matter of days or weeks.
Treatment Re-alignment as previously described and a mid-cannon deep flexor tenotomy (see video below) is my preference for all deep flexor contraction cases. The prognosis is quite good for slow sport, athletic soundness provided post-op management meets the demands of normal tendon repair.


Comments